Stable Diffusion Foundation
I think learning ComfyUI should start with theory.
Compared to traditional drawing tools (like Photoshop or Figma), the biggest difference with AI drawing tools is that many of their configurations and operations are non-visual, and the results are random. The former means that when you change a configuration, there might not be any visible reaction on the interface, making it difficult to learn through self-exploration like you would with Figma. The latter can lead to frustration because even if you follow someone else’s tutorial step by step, you might not get the same results.
So is there a solution?
I believe that when learning such tools, the first step isn’t learning how to use them, but rather starting with AI-related theory. Only after understanding this knowledge will you know what the various configurations in these drawing tools are actually for, and even be able to extrapolate and combine more ways to use them.
Therefore, this tutorial series will start with Stable Diffusion basics. After understanding the basic concepts of Stable Diffusion, I will then introduce how to use ComfyUI, at which point you’ll be able to “know both what and why.”
1. Stable Diffusion Overview
Note:
- In the tutorial, you’ll see highlighted content, such as Latent Space. This means it might be mentioned again in subsequent tutorials, or appear in ComfyUI, and you should pay special attention to it.
- To reduce the learning curve, I will try to minimize mathematical knowledge points and use analogies to help you understand certain concepts. Therefore, there might be instances where explanations aren’t entirely rigorous. If you have better explanations, please feel free to leave a comment or join our community to contact me.
Strictly speaking, Stable Diffusion is a system composed of several components (models), rather than a single model.
Taking the most common text-to-image generation as an example, I’ll explain Stable Diffusion’s overall architecture and working principles.
When we input a prompt, such as “Cat, standing on the castle”, Stable Diffusion will generate an image of a cat standing on a castle. While it seems like just one step:
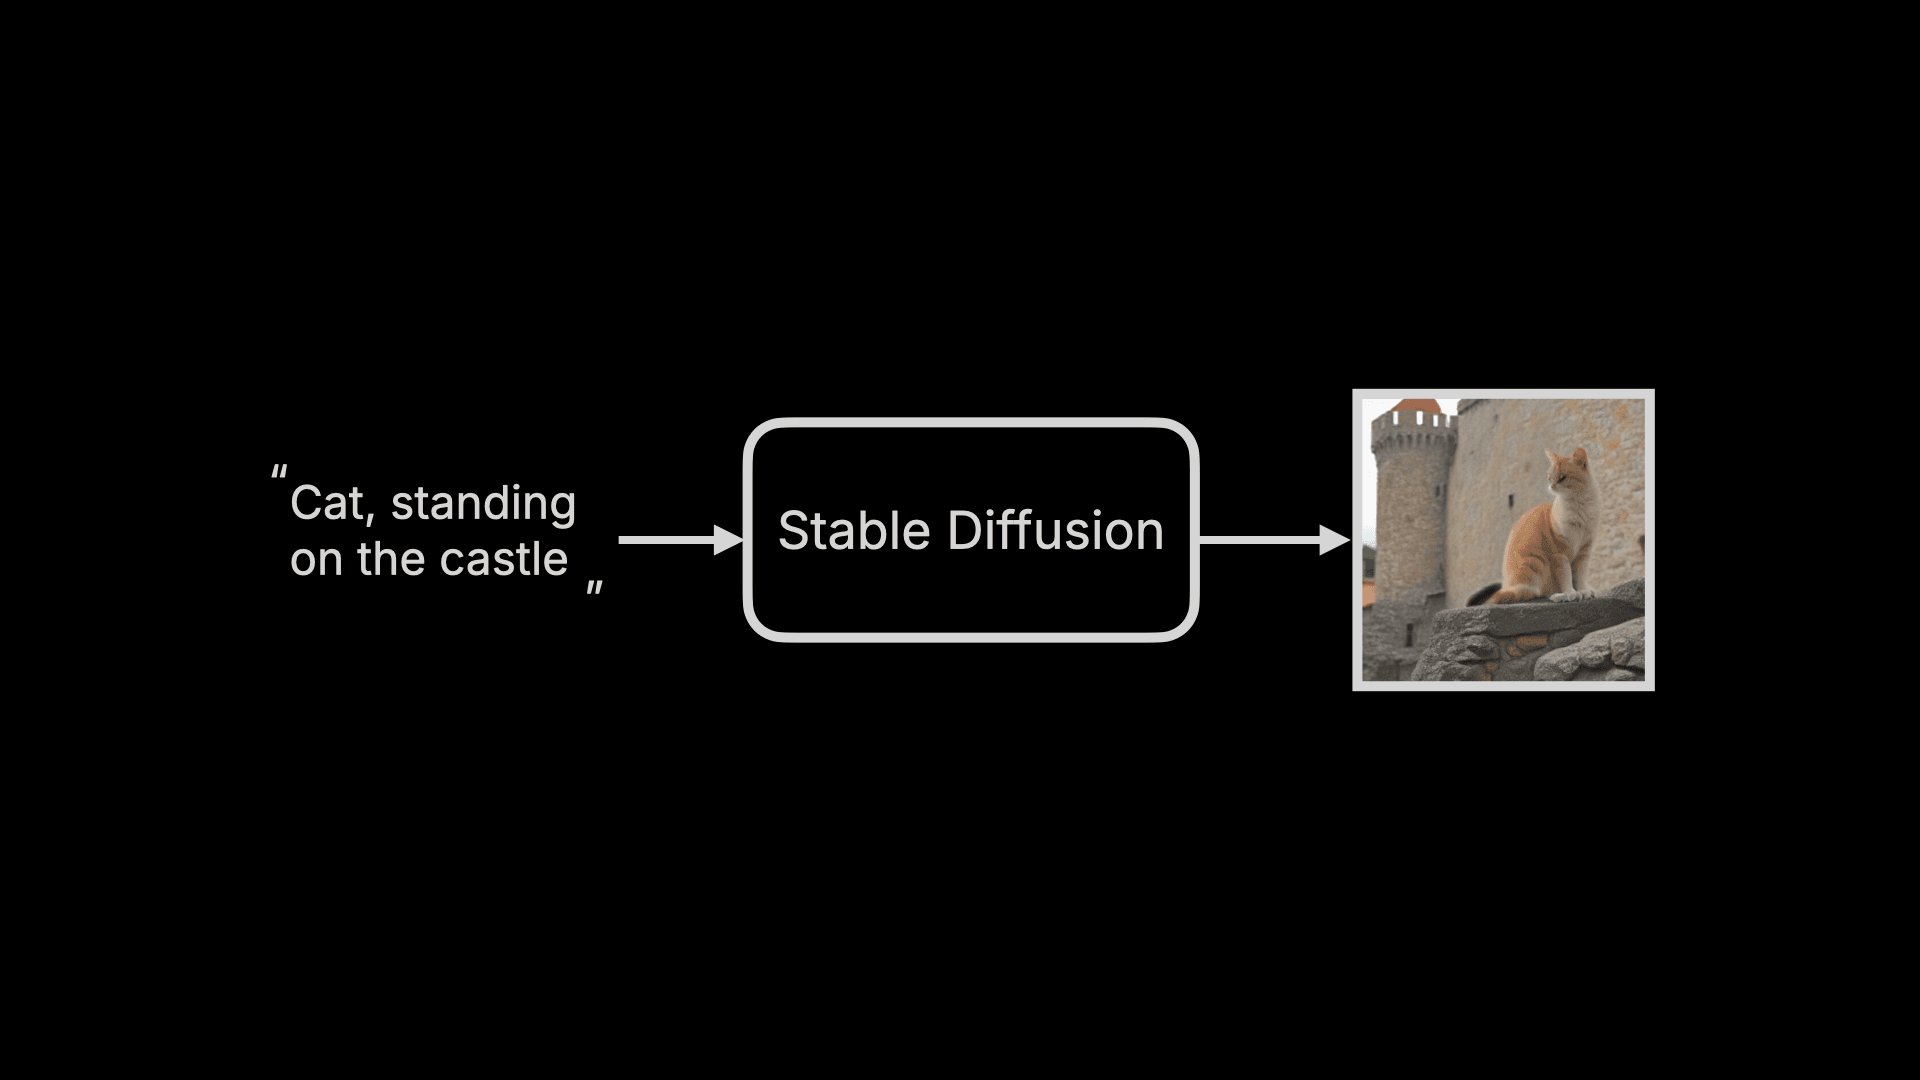
However, the entire generation process actually goes through three major steps. I’ll first give an overview of these three steps to help everyone gain an overall understanding of Stable Diffusion, and then dive into the details:
- First, the user’s input Prompt is compiled into word feature vectors by something called a Text Encoder. This step outputs 77 vectors of equal length, with each vector containing 768 dimensions. I’ll explain the role of these vectors later, but for now, you can simply understand it as “converting text into machine-readable sets of numbers.”
- Next, these feature vectors, along with a random image (you can think of this as an image full of electronic snow, or information noise), are fed into the Image Information Creator. In this step, the machine first transforms these feature vectors and the random image into a Latent Space, then “denoises” the random image into an “intermediate product” based on these feature vectors. You can simply understand that this “intermediate product” is an incomprehensible “image” to humans - it’s just a bunch of numbers, but at this point, the information it represents is already a cat standing on a castle.
- Finally, this intermediate product is decoded into an actual image by the Image Decoder.
If we visualize these three major steps, it would look like this:
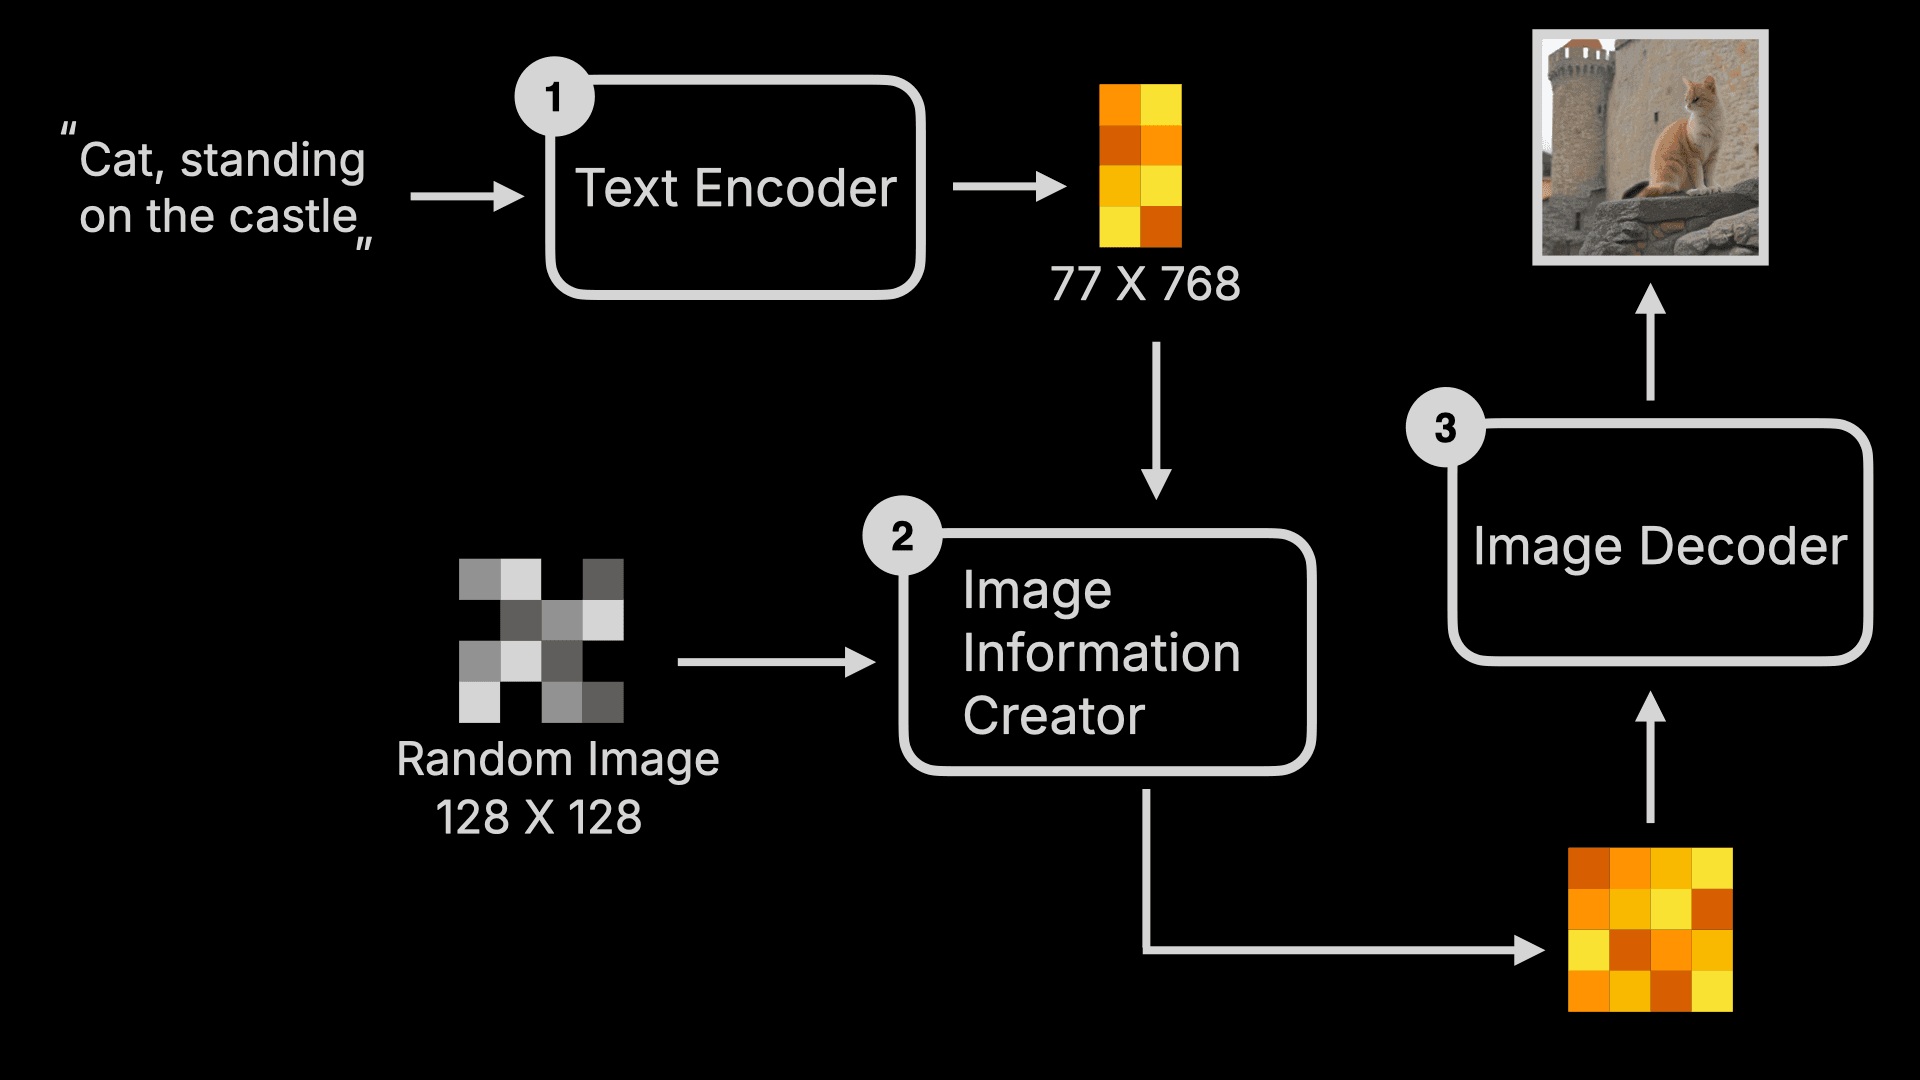
To summarize, in simple terms, when a user inputs a Prompt command, the machine follows this command to denoise a random image into an image that matches the command within a latent space.
In this entire process, rather than saying AI is “generating” images, it would be more appropriate to call it “sculpting.” It’s like what Michelangelo said after completing the David statue: the statue was already in the stone, I just removed the parts that weren’t needed.
All images exist within a noisy image, and AI just removes the unwanted parts. So if you use Midjourney, which is also built with a Diffusion Model, you’ll see the following process - starting with a blurry or even black image, then gradually becoming clearer. This is the “denoising” or “sculpting” process I mentioned earlier:
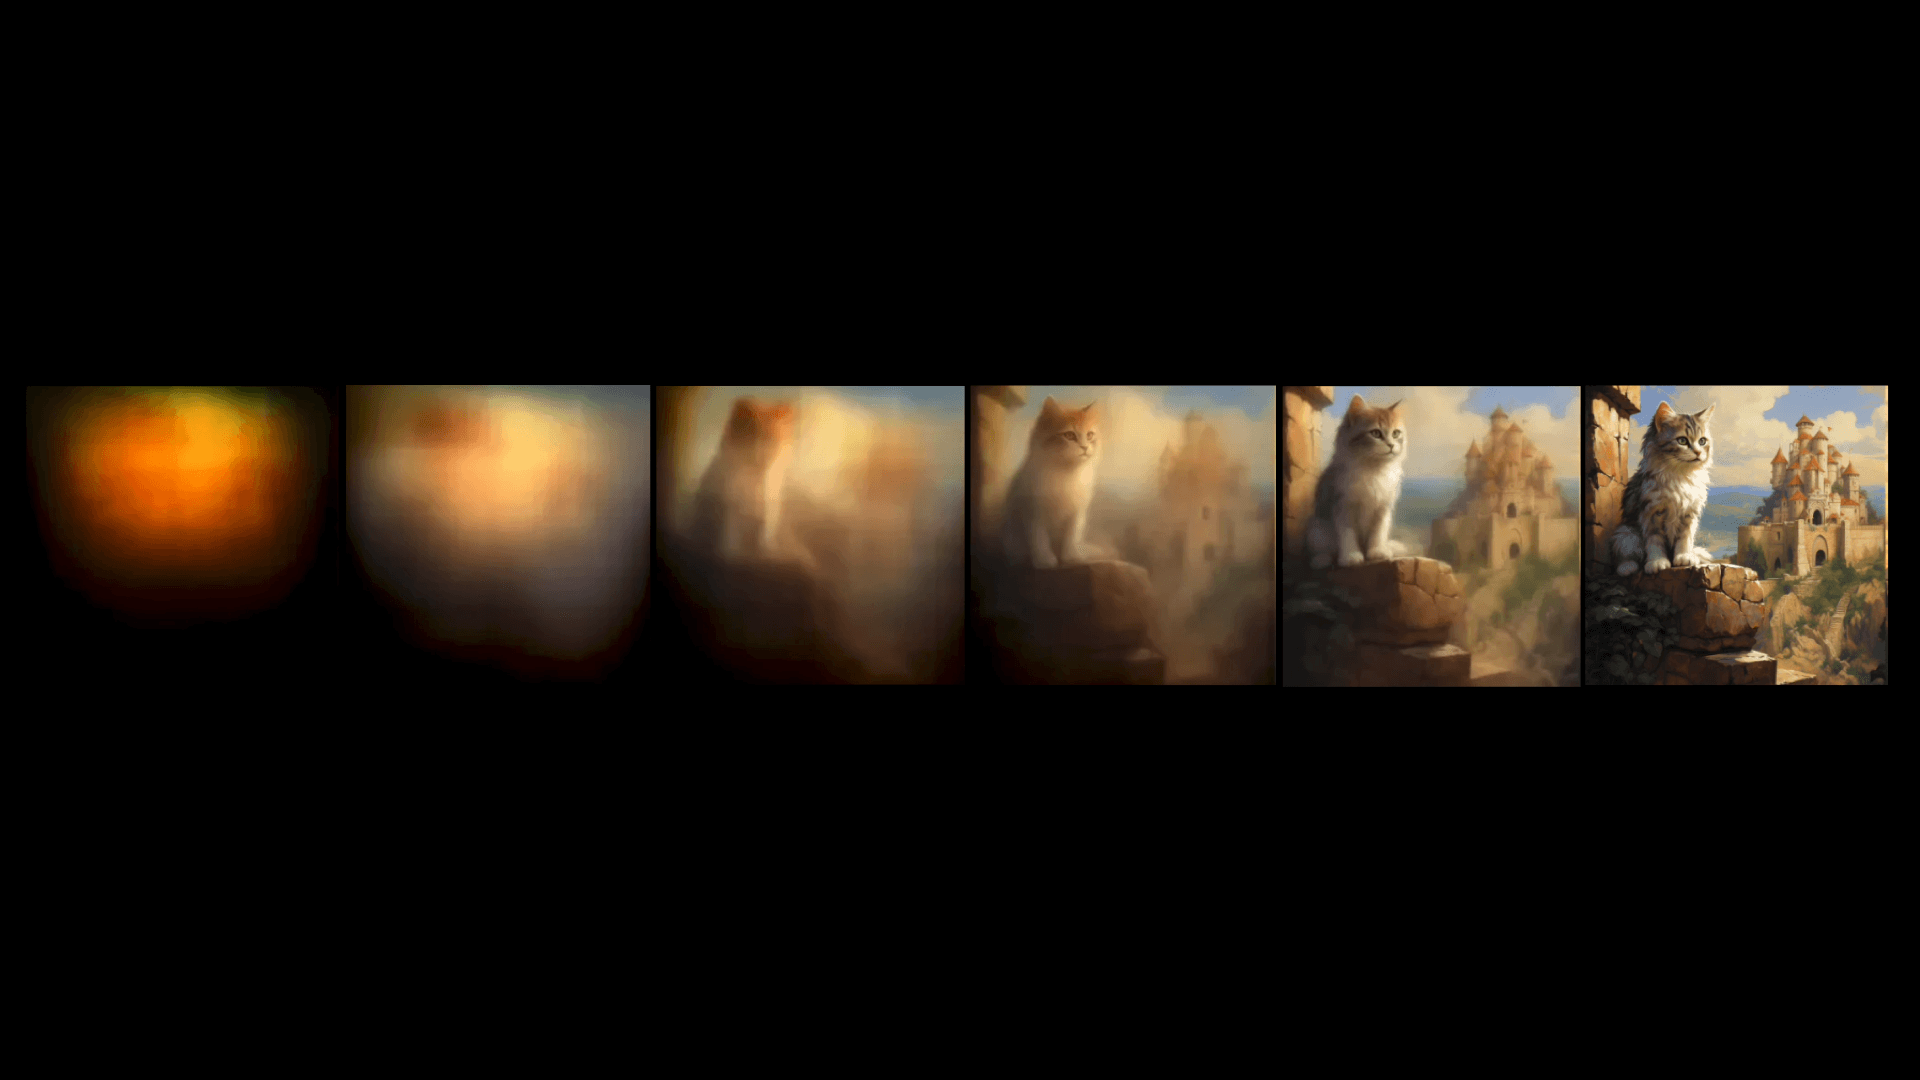
You might wonder why in the previous explanation, Stable Diffusion outputs the image directly, unlike Midjourney? Actually, in step two, the machine performs multiple rounds of “denoising” on the image, but it doesn’t decode each intermediate result with the Image Decoder, only decoding the final result into a photo. That’s why when you use Stable Diffusion, you don’t see the generation process like in Midjourney.
2. Image Information Creator
Since we’re talking about denoising, let’s expand on the entire “denoising” process.
First, the entire denoising process takes place in a Latent Space, and will go through multiple Steps of denoising. You can adjust these Steps - generally, more steps mean better image quality but longer processing time. Of course, this also depends on the model - Stable Diffusion XL Turbo can generate images in 1 step, taking less than 1 second, while still producing good quality images. If we visualize this process, it looks something like this (for better explanation, I’ve described the black blocks below as images, though they’re essentially just image-related data):
So what happens inside Denoise? Here’s a visualization of the first Denoise process:
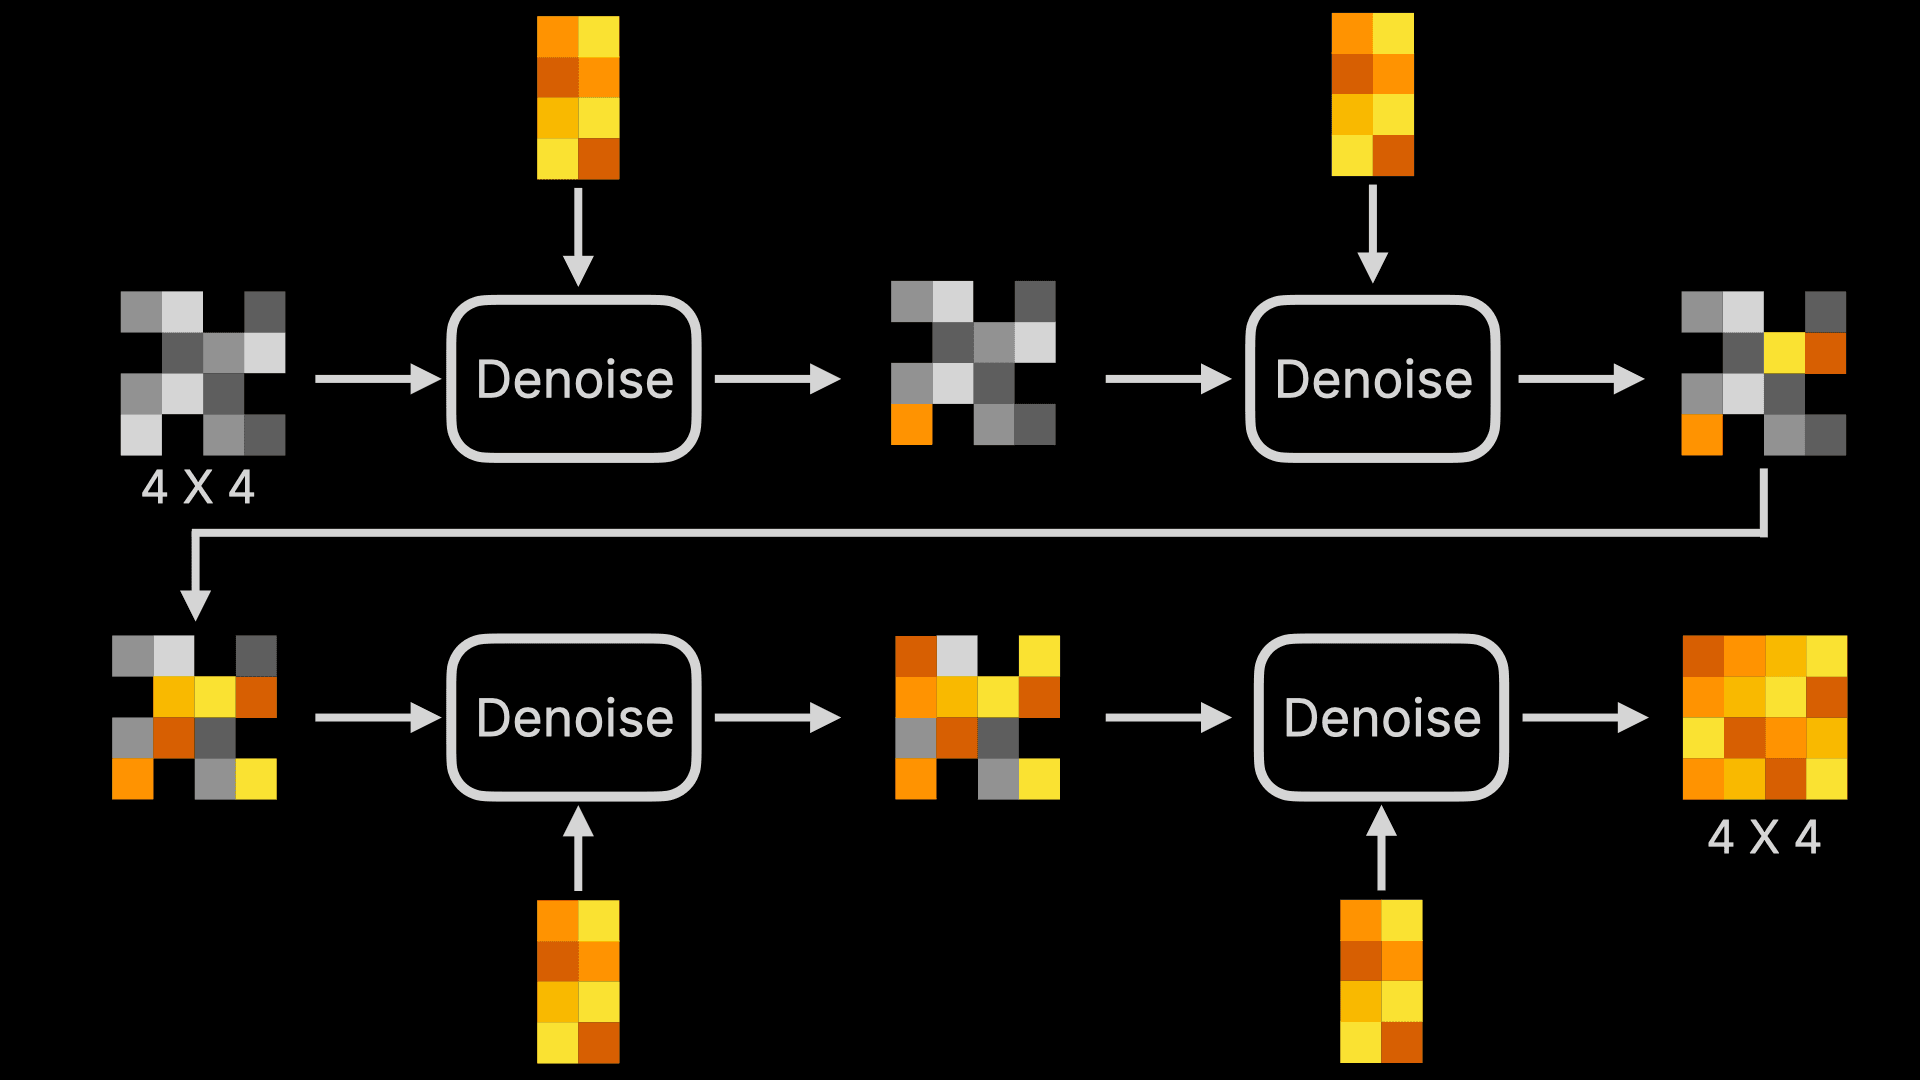
The above diagram looks complex, but don’t be intimidated - we only need to understand basic arithmetic to comprehend each Denoise:
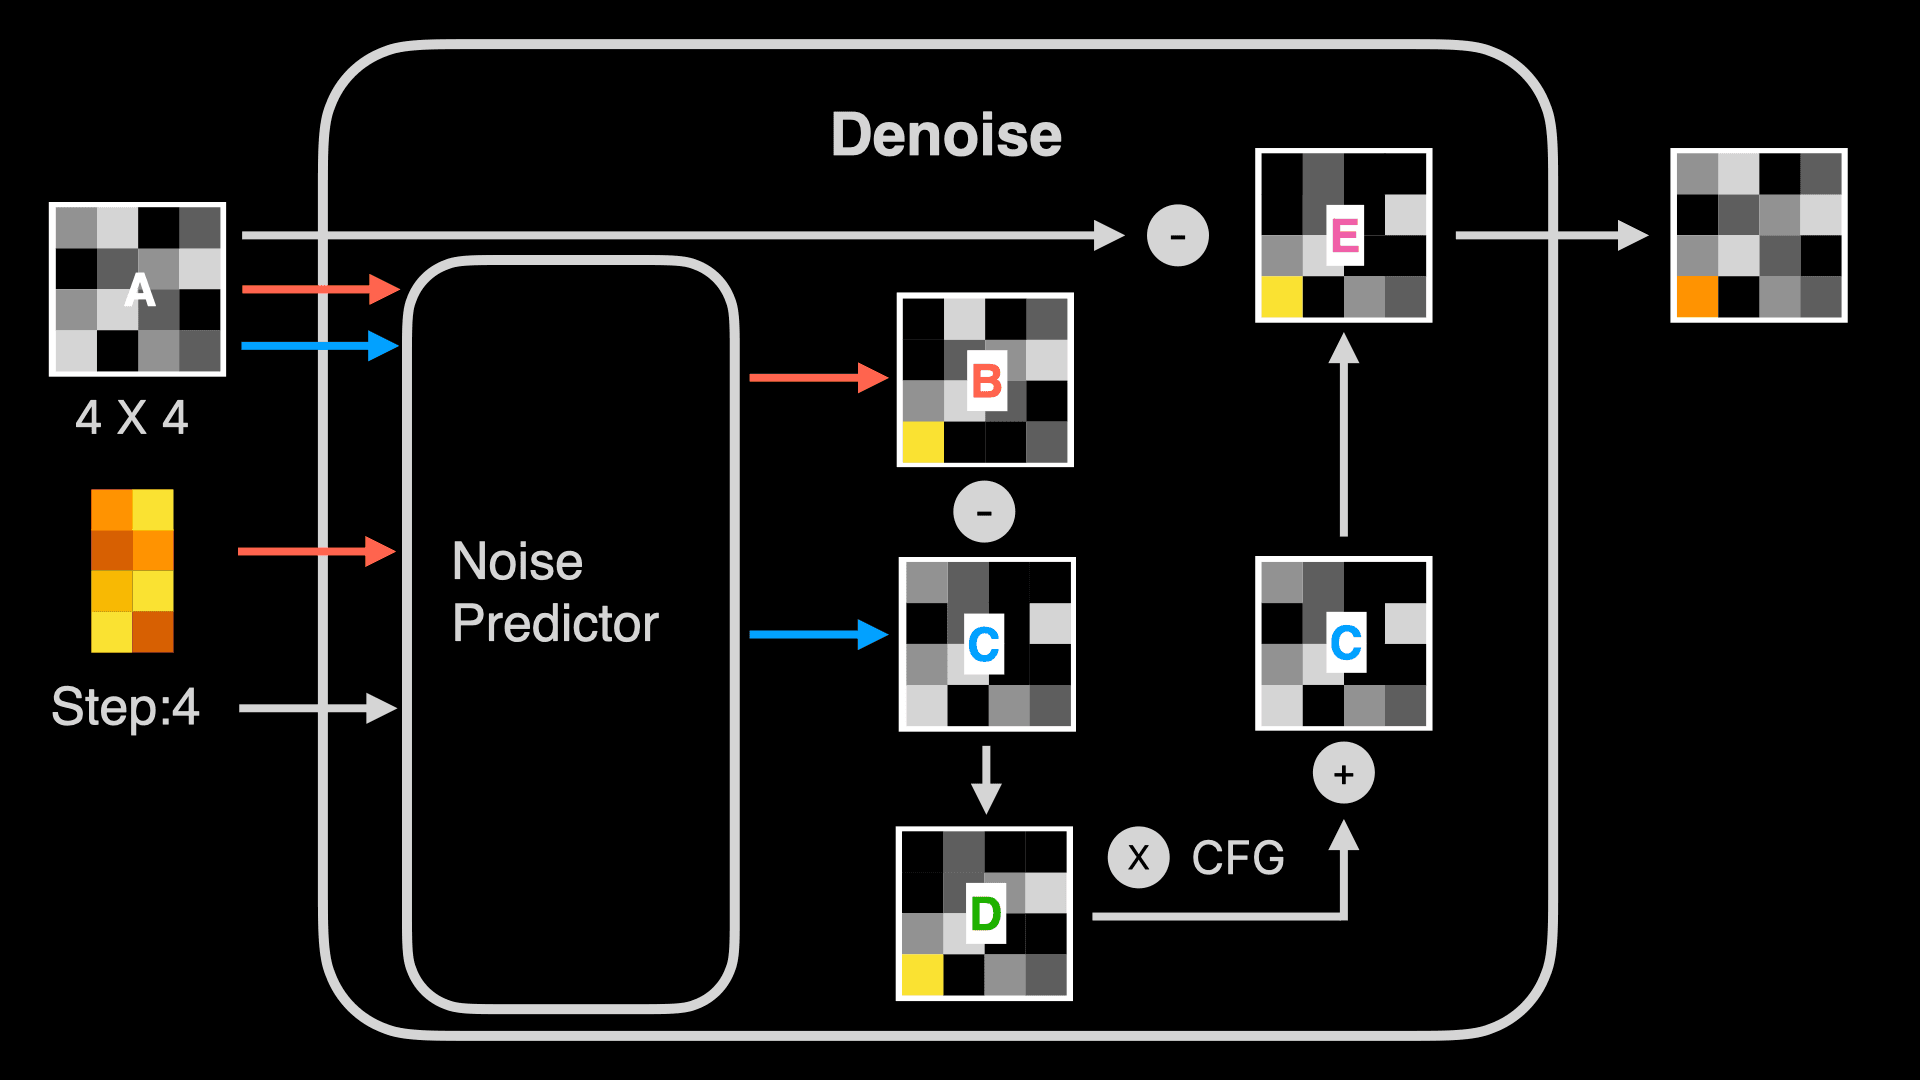
- First, within Denoise there’s a Noise Predictor, which, as the name suggests, is a model that can predict what noise is contained in the random image. Besides inputting the random image and Prompt’s word feature vectors, it also needs the current Step number. Although you see multiple Denoises in the visualization above, the program is actually running the same Denoise, so the Step needs to be provided to let the Noise Predictor know which step of prediction it’s performing.
- Then, looking at the orange line, the Noise Predictor uses the random image (for example, a 4 X 4 image) and the Prompt’s word feature vectors to predict a noise image B. Note that this isn’t outputting an actual image, but a noise image. In other words, the Noise Predictor predicts which unwanted noise exists in this random image based on the word vectors. Using the sculpting analogy from earlier, it outputs the waste material not needed for the sculpture. Simultaneously, the Noise Predictor also predicts a noise image C without using the Prompt’s word feature vectors (shown by the blue line).
You might wonder why I highlighted 4 X 4? Looking at the complete Denoise process, you’ll notice that at the start, the random image is 4 X 4, and the result is also 4 X 4. This means if you want to change the final generated image’s ratio or size, you need to modify the random image’s ratio or size, rather than giving adjustment instructions through the Prompt. Using the sculpting analogy makes this easy to understand - with a 1 cubic meter stone, no matter how skilled the sculptor is, they can’t create a 10-meter-tall sculpture. They can only sculpt a 1-meter-tall sculpture at most.
- Next, Denoise subtracts noise image C from B to get image D. Let’s explain this image with simple math. First, image B is noise predicted using both Prompt and random image, simply put, it contains “noise predicted based on Prompt” + “noise predicted based on random image”, while C is “noise predicted based on random image”. B minus C equals “noise predicted based on Prompt”.
- Next, Denoise subtracts noise image B from C to get image D. Let’s explain this image with simple math. First, image B is noise predicted using both Prompt and random image, simply put, it contains “noise predicted based on Prompt” + “noise predicted based on random image”, while C is “noise predicted based on random image”. B minus C equals “noise predicted based on Prompt”.
- After that, Denoise amplifies noise D, usually by multiplying it with a coefficient, which is represented as CFG, CFG Scale, or Guidance Scale in some Stable Diffusion implementations. Then this amplified image is added to noise image C to get image E. This is done to improve the accuracy of image generation by deliberately increasing the weight of “noise predicted based on Prompt” through multiplication with a coefficient. Without this step, the generated image would be less relevant to the Prompt. This method is also known as Classifier Free Guidance.
- Finally, Denoise subtracts image E from image A to get a new image. This is the “sculpting” process I mentioned earlier, removing unwanted noise.
If you’ve used Stable Diffusion tools, you’ll notice there are two Prompt input boxes - one for positive and one for negative prompts. How do negative prompts work? Using the math method above, simply put, when you input a negative prompt, it also generates a noise image B2. However, in this case, we subtract B2 from the noise image B1 (generated from the positive prompt) and then subtract C to get D. This means the final generated image will be further away from B2, as more noise related to B2 has been removed.
3. Image Decoder
Let’s talk about the Latent Space. When learning this concept, my biggest question was why perform operations in latent space? Why not denoise images directly?
To answer this question, we first need to understand what latent space is.
Latent space refers to a lower-dimensional space used to represent data in machine learning and deep learning. It’s a set of latent variables obtained by encoding and dimensionality reduction of original data. The dimension of latent space is usually lower than that of the original data, allowing it to extract the most important features and structures from the data.
This sounds complex, but simply put, latent space encodes images into numbers and compresses these numbers. Let’s visualize this process:
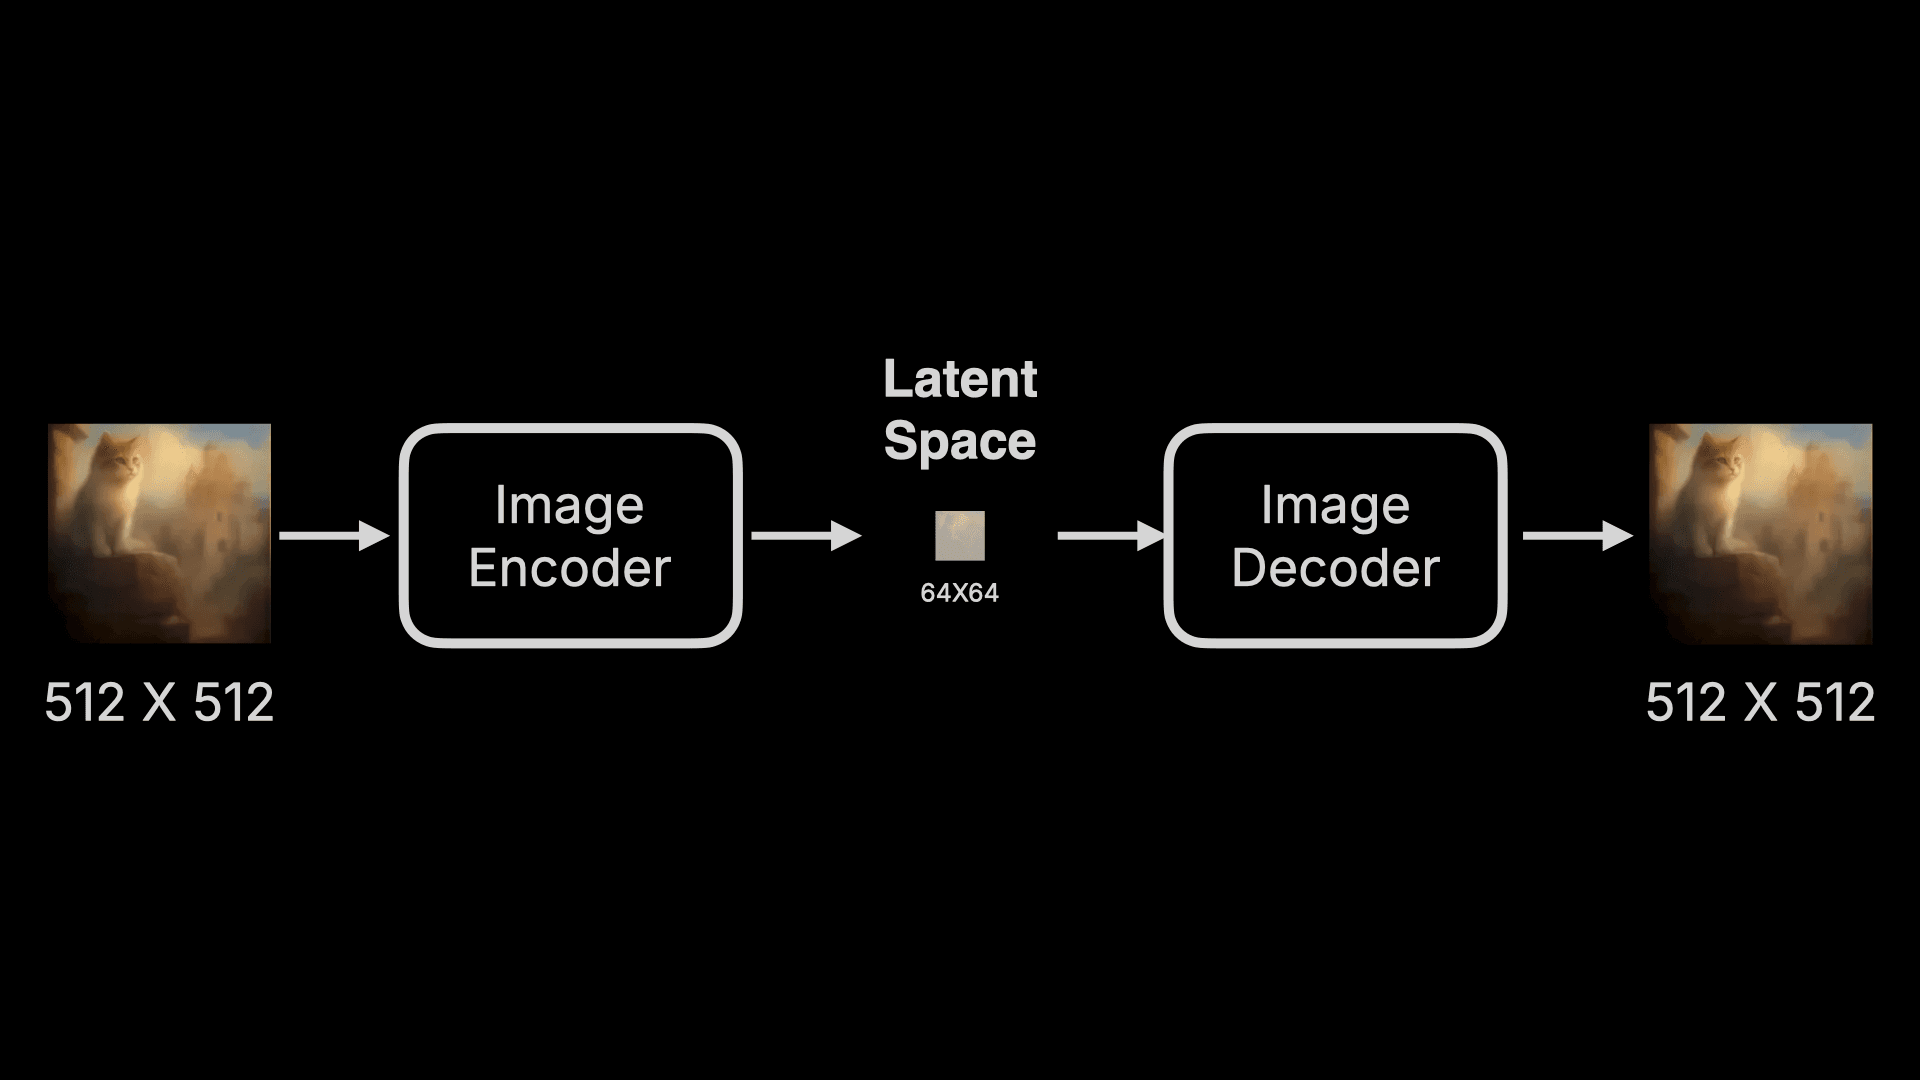
An image is first encoded into a set of data by an Image Encoder and compressed. To measure this compression in terms of pixels, an original 512 X 512 image might be compressed to 64 X 64, greatly reducing the data, and then restored using an Image Decoder. This Encoder plus Decoder component is called a Variational Auto Encoder (VAE). That’s why this Image Decoder is also called VAE Decoder in some products.
So what are the advantages and disadvantages of using this technology?
Advantages:
- First, efficiency is greatly improved. With VAE, even consumer GPUs can complete denoising calculations relatively quickly. Model training time is also shorter.
- Additionally, the dimension of latent space is usually much lower than that of the original image, meaning it can represent image features more efficiently. Operating and interpolating in latent space allows for more precise control and editing of images. This enables better control over image details and style during generation, improving the quality and realism of generated images.
Disadvantages:
- Encoding and then restoring data leads to some data loss. Also, due to the lower dimensionality of latent space, it might not fully capture all details and features from the original data. This ultimately results in somewhat strange restored images.
Why is text usually strange in Stable Diffusion generated images? During this process, on one hand, some detailed features of text are lost. On the other hand, text prediction is less coherent compared to image prediction during noise prediction. For example, predicting cat features is relatively simple because a cat likely has 2 eyes with a nose below - it’s coherent. But English “Cat” and Chinese “猫” are very different and harder to predict. For instance, Chinese characters are typically composed of horizontal, vertical, hook, and other strokes, but how do you predict what comes after a certain stroke?
4. Text Encoder
In the process described at the beginning, I mentioned that the Text Encoder compiles your input Prompt into word feature vectors. This step outputs 77 vectors of equal length, with each vector containing 768 dimensions. What’s the purpose of these vectors?
There’s another interesting question: when we only input “Cat” in the Prompt without adding “orange”, why is the output cat orange? To answer these questions, we need to understand how the Text Encoder works.
Currently, Stable Diffusion commonly uses the CLIP model open-sourced by OpenAI, which stands for Contrastive Language Image Pre-training. Let’s draw a diagram as usual:
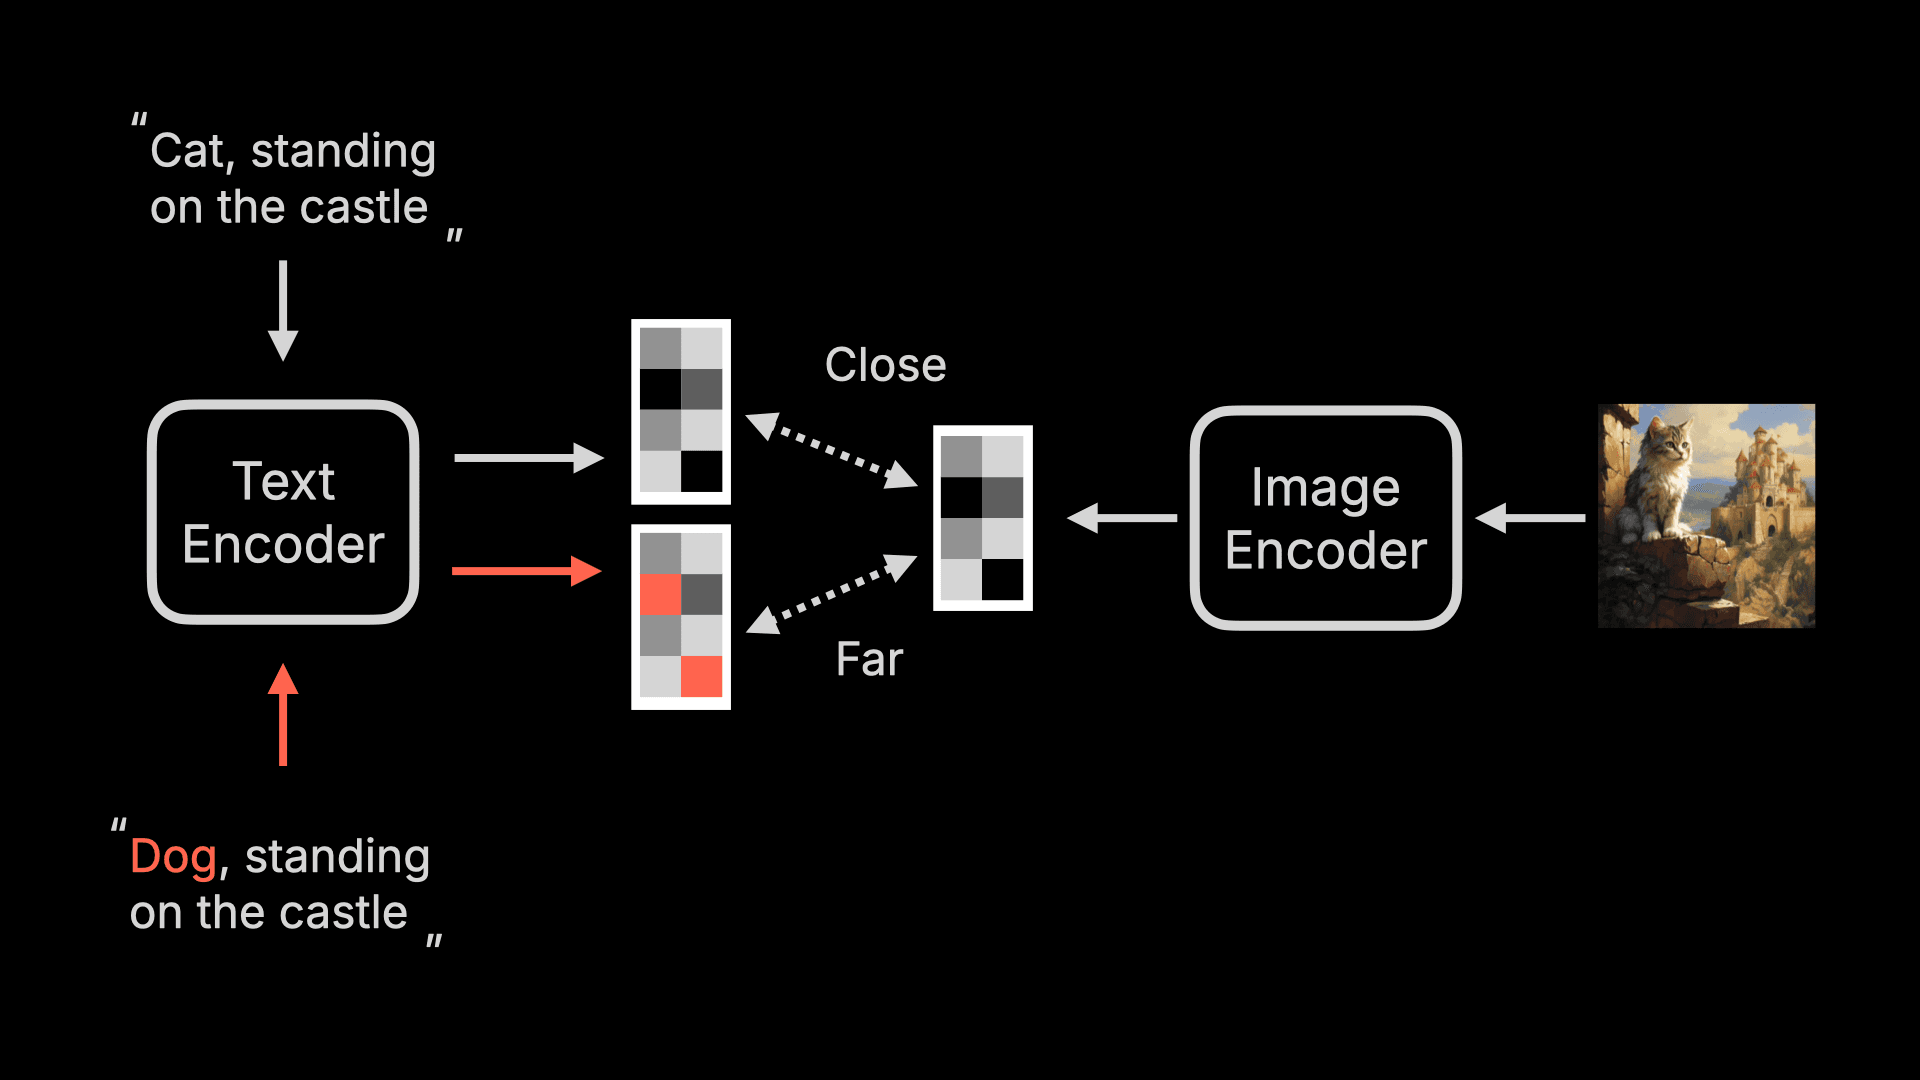
First, this CLIP also has a Text Encoder, which converts text into a feature vector. It also has an Image Encoder that converts images into various feature vectors. If these two vectors are closer, it means the description is closer to the image content; otherwise, it is less related.
OpenAI used 400 million pairs of image and text to train this model, and the final CLIP model is shown below. When we input the description of an image, CLIP can determine which image is most similar to this description. For example, in the fourth row from the bottom, the description is “a photo of a spotted cat’s face,” and it is most similar to the fourth vertical image, with a similarity of 0.31, while the similarity to the first book screenshot is only 0.12.
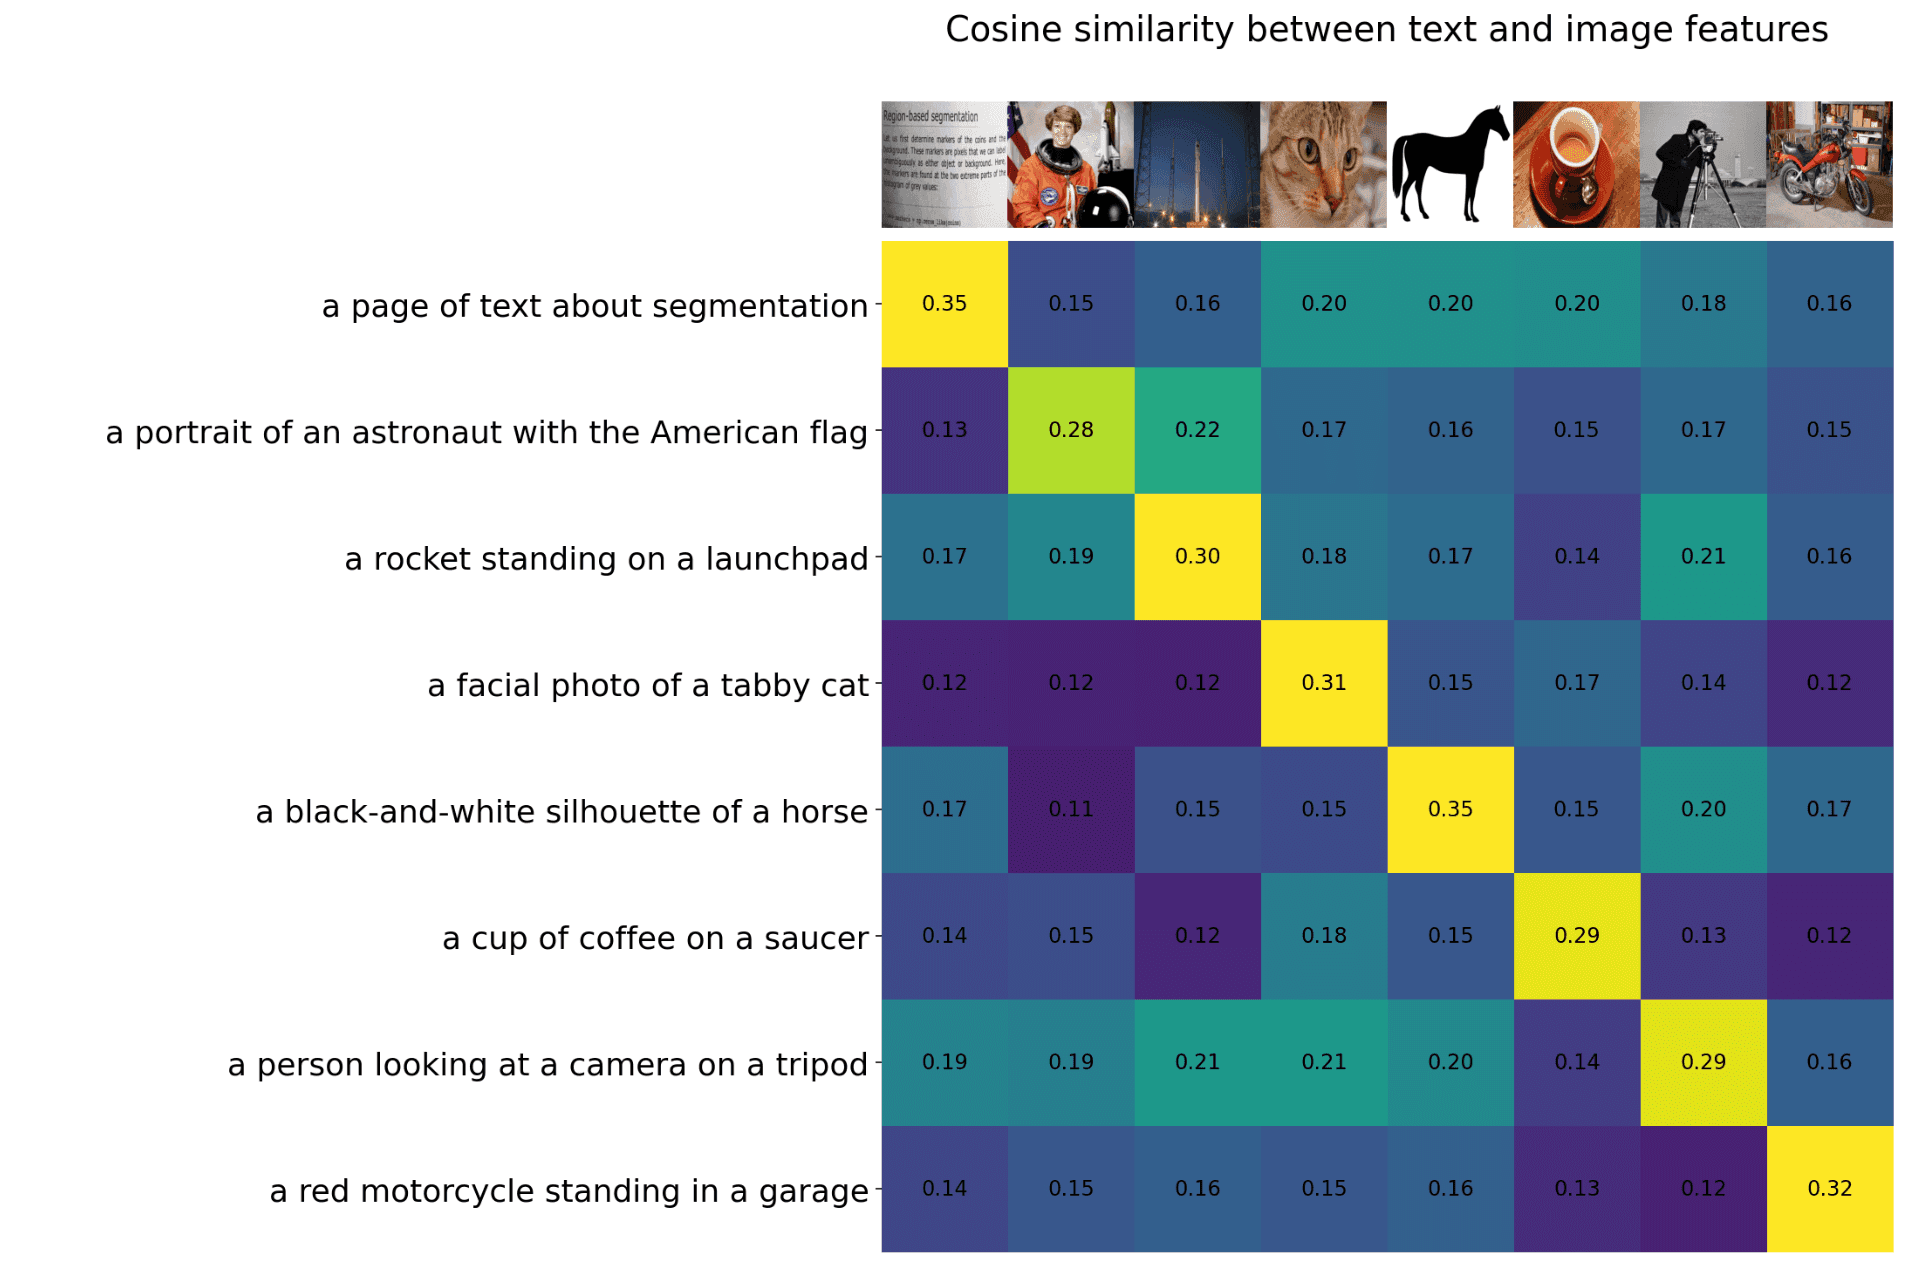
We return to Stable Diffusion. In Stable Diffusion, we only use the Text Encoder part of CLIP, because it can convert text into feature vectors corresponding to the text, and these feature vectors are related to real images.
Returning to the two questions mentioned earlier, they are actually the answers to each other 😁
Why does the generated image mostly look like a tabby cat or a spotted cat when we input “Cat”? Because the Text Encoder converts “Cat” into 77 vectors of equal length, and these vectors will contain some features and meanings related to Cat:
-
Shape features: The vector representation may capture Cat’s shape features, such as its body size, head shape, and limb position. These features help distinguish Cat from other animals or objects.
-
Visual features: The vector representation may include visual features of Cat, such as its color, pattern, and eye shape. These features help identify Cat’s appearance characteristics.
-
Semantic meaning: The vector representation may include semantic meanings related to Cat, such as it being a pet, a standalone animal, or having a close relationship with humans. These meanings help understand Cat’s role and significance in human culture and society.
Note: Because the model has some areas that are not explainable, the vectors may not actually contain these features, but are mainly used for better explanation. So I gave some more concrete examples.
Finally, because only the Text Encoder part of CLIP is used in Stable Diffusion, it’s also called CLIP Text Encoder or CLIP Text Encode in some products.
Why is it not necessary to pay attention to syntax when using Stable Diffusion or Midjourney? And why is it case-insensitive? Because these Prompts are converted into feature vectors by the Text Encoder, and syntax and case are converted into feature vectors, which are just a string of numbers. Without adjusting the model, these are not sensitive.
5. Summary
Thank you for reading this long explanation of Stable Diffusion basics. Next, we’ll start the ComfyUI tutorial. I believe that once you understand these basic concepts, learning ComfyUI will be much easier.